Using the new API for Apple Business/School Manager
WWDC 2025 brings a long awaited and exciting new feature to ABM/ASM.
🎉 An API 🎉
I’m still catching up on WWDC news but as this one ticks a huge box for my workloads, here’s the quickest of quick start guides …
From now on I’m going to use the term ABM to refer to both Apple Business Manager and Apple School Manager
Source documentation can be found at on the Apple School and Business Manager API developer web page and contains comprehensive information on what API’s are available. You should read that to get all the details on the features that have been added.
Quick Start
1 - Creating an API key
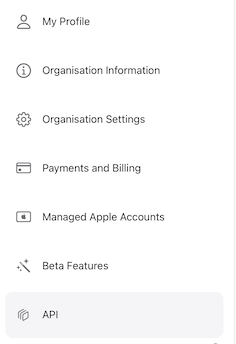
- Log on to your ABM
- On the bottom left, click your name and select “Preferences”
-
There should be a new section in your profile called “API”. Click on that
-
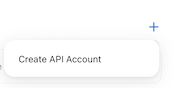
You will see a list of API accounts (or none if you don’t have any already). Click the “+” button to create a new API Account
-
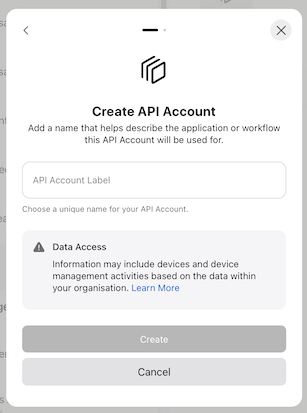
Give your API a new label, e.g. “My API”, then click “Create”
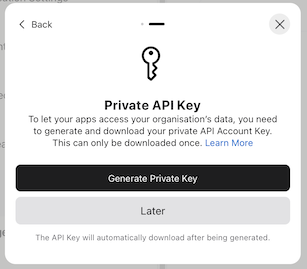
- Click the “Generate Private Key” button. The new key will be created and downloaded.
- Note: This key is private and should not be shared. Keep it safe. You can’t re-download it but you can revoke it and create a new API key.
2 - Getting your details
Once created, your new API account will appear in the lsit of accounts. You can create more than one.
Click “Manage” to see the relevant details you will need, namely:

- Key ID
- Client ID
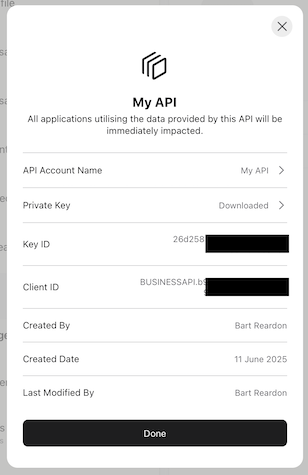
Write these down for the next step, but you can get them at any time from this section.
3 - Using the key to create a Client Assertion
Unlike other API’s where you encode some account credentials and then request a bearer token, Apple requires you create a JSON web token (JWT) using your API Key. Details on how to do this are on the Implementing OAuth for the Apple School and Business Manager API page.
Apple provide a handy python script you can use to generate the client assertion. If you are using this on macOS you will need the following:
- Python 3 (installed if you have xcode or command line tools installed)
- authlib library
- Crypto library
Copy and save locally as create_client_assertion.py
To get the two required librariues you can run the following:
pip3 install authlib PyCryptodome
Don’t install crypto or pycrypto as those don’t have ECC which is required in the Apple python script.
update the following with the values that you got earlier from your API account:
private_key_file = "private-key.pem"
client_id = "BUSINESSAPI.9703f56c-10ce-4876-8f59-e78e5e23a152"
team_id = "BUSINESSAPI.9703f56c-10ce-4876-8f59-e78e5e23a152"
key_id = "d136aa66-0c3b-4bd4-9892-c20e8db024ab"
ZSH Script:
If you don’t want to use python, I’ve ported the script to zsh as create_client_assertion.sh
It works exactly the same as the python script. You can pass in your client id and private key or hard code them in.
Creating the client assertion:
To create your client assertion file, place your private key in the same folder as your script and run:
python:
python3 create_client_assertion.py
zsh:
./create_client_assertion.sh
# or if your values aren't hard coded
./create_client_assertion.sh "path_to_key.pem" "<client_id>" "<key_id>"
# where path_to_key.pem is your private key
# and <client_id> and <key_id> are your values from ABM
You should get a file client_assertion.txt with contents that looks something like:
eyJhbGciOiJFUzI1NiIsImtpZCI6ImQxMzZhYTY2LTBjM2ItNGJkNC05ODkyLWMyMGU4ZGIwMjRhYiIsInR5cCI6IkpXVCJ9.eyJzdWIiOiJCVVNJTkVTU0FQSS45NzAzZjU2Yy0xMGNlLTQ4NzYtOGY1OS1lNzhlNWUyM2ExNTIiLCJhdWQiOiJodHRwczovL2FjY291bnQuYXBwbGUuY29tL2F1dGgvb2F1dGgyL3YyL3Rva2VuIiwiaWF0IjoxNzQ5NjI5MTEwLCJleHAiOjE3NjUxODExMTAsImp0aSI6IkZBODBGMzI1LTk1NUMtNDIzMy04NDIyLUM0ODBERDEzNjc5RSIsImlzcyI6IkJVU0lORVNTQVBJLjk3MDNmNTZjLTEwY2UtNDg3Ni04ZjU5LWU3OGU1ZTIzYTE1MiJ9.cM4boKJ8xvLeN0fiMEDLeCdxyVizQuHLucuGaUAo5w7aeyhIgvug7tmnDxJwiS0AdRYW8FY7Lu97ufmYSGhKmQ
This will be valid for 180 days so you don’t need to run this process every time you want to use the ABM API.
4 Accessing the API
Finally - seems like we’ve done a lot so far but we’re at the business end now.
Once you have your client assertion you can use it to generate a bearer token and then start fetching data from ABM.
#!/bin/zsh

# Client assertion
client_assert="nQuYXBwbGUuY29tL2F1dGg...etc...RYW8FY7Lu97ufmYSGhKmQ"
# Client ID from API Account
client_id="BUSINESSAPI.9703f56c-10ce-4876-8f59-e78e5e23a152"

# make the request
request_json=$(curl -s -X POST \
-H 'Host: account.apple.com' \
-H 'Content-Type: application/x-www-form-urlencoded' \
"https://account.apple.com/auth/oauth2/token?grant_type=client_credentials&client_id=${client_id}&client_assertion_type=urn:ietf:params:oauth:client-assertion-type:jwt-bearer&client_assertion=${client_assert}&scope=business.api")

# <insert validation checking here>

# presuming everything worked
ACCESS_TOKEN=$(echo $request_json | jq -r '.access_token')

## Fetch all organisational devices:
curl "https://api-business.apple.com/v1/orgDevices" -H "Authorization: Bearer ${ACCESS_TOKEN}"
Presuming the client assertion process worked you should now see a json representation of your devices from ABM as described in the API reference documentation
The access token will be valid for 1 hour after creation after which it will expire and you will need to create a new one if needed.
For more comprehensive details, do go and read Apple’s official documentation: https://developer.apple.com/documentation/applebusinessmanagerapi